
一、准备工作
安装相关的包:
opencv-python、opencv-contrib-python、numpy、mediapipe、cvzone
大致包名和版本如下图:


二、开始编写代码
导入需要使用的包
#opencv相关
import cv2 as cv

#cvzone相关
import cvzone
#2、矩形使用
import numpy as np
#cvzone中手部图像的检测包(这个包调用了mediapipe)
from cvzone.HandTrackingModule import HandDetector

#其他包
import os
import time
编写代码:
1、图片
#beginTime = 0
#nowTime = 0

#初始化摄像头
cap = cv.VideoCapture(0 + cv.CAP_DSHOW)
#fps
fpsReader = cvzone.FPS()

#设置视频分辨率
cap.set(3,1280)
cap.set(4,720)

#四个参数分别是输入图像类型(为空则默认为False即视频流),检测的手部数量、最小检测置信度,最小跟踪置信度
detector = HandDetector(detectionCon=0.65)

#创建绘制图像的类,这样做的好处是方便以后的维护
class DragImg():
    def __init__(self,path,posOrigin,imgType):
        self.posOrigin = posOrigin
        self.imgType = imgType
        self.path = path

        if self.imgType == 'png':
            self.img = cv.imread(self.path,cv.IMREAD_UNCHANGED)
        else:
            self.img = cv.imread(self.path)
        # 忽略两个参数self.img.shape【0】,...
        self.size = self.img.shape[:2]
    #根据cursor更新图像位置
    def update(self,cursor):
        ox,oy = self.posOrigin
        w,h = self.size
        if ox < cursor[0] < ox + w and oy < cursor[1] < oy + h:
            # print('接近图像')
            self.posOrigin = cursor[0] - w // 2, cursor[1] - h // 2


#img1 = cv.imread('PNGImage/mpcenter.PNG')
#img2 = cv.imread('PNGImage/music.png',cv.IMREAD_UNCHANGED)

#ox , oy = 200,200
#添加所有图像
path = 'PNGImage'
myList = os.listdir(path)
print(myList)
listImg = []
for x,pathImg in enumerate(myList):
    if 'png' in pathImg:
        imgType = 'png'
    else:
        imgType = 'jpg'
    listImg.append(DragImg(f'{path}/{pathImg}',[x * 300,100],imgType))

while True:
    #cap.read()返回两个参数,第一个参数是bool类型,读取帧是正确的则返回True
    success, img = cap.read()
    #图像翻转
    img = cv.flip(img, 1)
    #手部定位,1.5版本则是hands,img = detector.findHands(img),1.5以下是img = detector.findHands(img)
    hands,img = detector.findHands(img)
    #Draw pNG
    for imgObject in listImg:
        h, w = imgObject.size
        ox,oy = imgObject.posOrigin
        if imgObject.imgType == 'png':

            #如果图像格式为png则使图像透明化
            img = cvzone.overlayPNG(img, imgObject.img, [ox, oy])
        else:
            img[oy:oy + h, ox:ox + w] = imgObject.img
    #img[oy:oy + h, ox:ox + w] = img2

    #如果手出现
    if hands:
        lmList = hands[0]['lmList']

        cursor = lmList[8]
        length,info,img = detector.findDistance(lmList[8],lmList[12],img)
        #print(length)

        #如果食指和中指的距离小于40则可以拖动图像即更新它的位置
        if length < 40 :
            cursor = lmList[8]
            for imgObject in listImg:
                imgObject.update(cursor)
    #FPS代码块(一)
    #nowTime = time.time()
    #fps = 1 / (nowTime - beginTime)
    #beginTime = nowTime
    #cv.putText(img, f'FPS:{int(fps)}', (20, 70), cv.FONT_HERSHEY_SIMPLEX, 1, (0, 255, 0), 2)
    #FPS代码块(二)
    fps, img = fpsReader.update(img, pos=(50, 80), color=(0, 255, 0), scale=5, thickness=5)
    #显示窗口名为img0
    cv.imshow('img0',img)
    #延时1ms等待键盘输入
    if cv.waitKey(1) & 0xFF == ord('q'):
        cv.destroyAllWindows()
        cap.release()
        break
2、矩形
cap = cv.VideoCapture(0 + cv.CAP_DSHOW)
cap.set(3,1280)
cap.set(4,720)
#精确值
detector = HandDetector(detectionCon=0.8)
colorR = (199,255,0)
cx,cy,w,h = 100,100,200,200


#画矩形
class DragRect():
    def __init__(self,posCenter,size = [200,200]):
        self.posCenter = posCenter
        self.size = size

    def update(self,cursor):
        cx,cy = self.posCenter
        w,h = self.size

        #如果手指在矩形范围内
        if cx - w // 2 < cursor[0] < cx + w // 2 and cy - h < cursor[1] < cy + h:
            #colorR = (0, 255, 0)
            self.posCenter = cursor

rectList = []
for x in range(5):
    rectList.append(DragRect([x*250 + 150,150]))

while True:
    #cvzone 1.4代码
    #succes,img = cap.read()
    #img = cv.flip(img,1)
    #img = detector.findHands(img)
    #lmlist,_= detector.findPosition(img)

    #if lmlist:
    #    l,_,_ = detector.findDistance(8,12,img,draw = False)#draw=flase不显示距离
    #    print(l)
    #    if l < 30:
    #        cursor = lmlist[8]
    #        #call upoate
    #        for rect in rectList:
    #            rect.update(cursor)

    #cvzone 1.5代码
    success, img = cap.read()  # cap.read()返回两个参数,第一个参数是bool类型,读取帧是正确的则返回True
    # 图像翻转
    img = cv.flip(img, 1)

    # 手部的定位,1.5版本则是hands,img = detector.findHands(img),1.5以下是img = detector.findHands(img)
    hands, img = detector.findHands(
img)

    if hands:
        lmList = hands[0]['lmList']
        length, info, img = detector.findDistance(lmList[8], lmList[12], img)
        print(length)
        if length < 30:
            cursor = lmList[8]
            #call upoate
            for rect in rectList:
                rect.update(cursor)

    #draw
    #for rect in rectList:
    #    cx, cy = rect.posCenter
    #    w, h = rect.size
    #    cv.rectangle(img, (cx - w // 2, cy - h // 2), (cx + w // 2, cy + h // 2), colorR, cv.FILLED)
    #    cvzone.cornerRect(img, (cx - w // 2, cy - h // 2, w, h ),20,rt=0)#添加角
    #画透明
    imgNew  = np.zeros_like(img,np.uint8)
    for rect in rectList:
        cx, cy = rect.posCenter
        w, h = rect.size
        cv.rectangle(imgNew, (cx - w // 2, cy - h // 2), (cx + w // 2, cy + h // 2), colorR, cv.FILLED)
        cvzone.cornerRect(imgNew, (cx - w // 2, cy - h // 2, w, h ),20,rt=0)#添加角
    out = img.copy()
    alpha = 0.5
    mask = imgNew.astype(bool)
    #print(mask.shape)
    out[mask] = cv.addWeighted(img,alpha,imgNew,1 - alpha,0)[mask]

    cv.imshow('Image',out)

    #延时1ms等待键盘输入
    if cv.waitKey(1) & 0xFF == ord('q'):
        cv.destroyAllWindows()
        cap.release()
        break
三、学习资料
1、学习地址
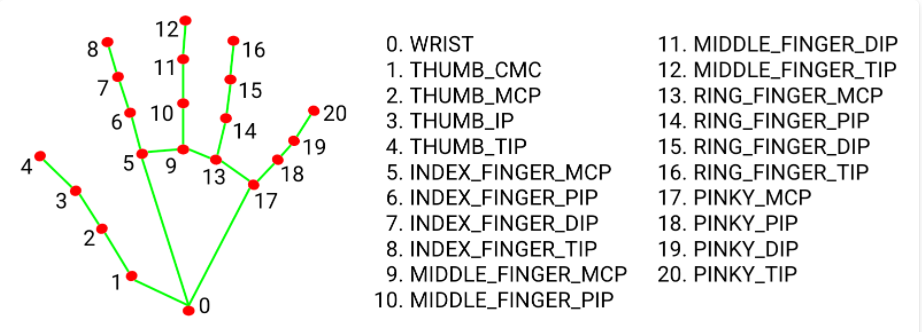
2、手地标模型
3、其他参数详解
cap.set()的使用:点击查看官方文档
CVzone的使用: Github